Timed Jobs Using launchd
Timed Jobs Using launchd
Beginning in Mac OS X v10.4, the preferred way to add a timed job is to use a launchd timed job. A daemon is a background process that provides a service to the users of the system. A launchd timed job is similar to a cron job, with two key differences:
- Each launchd job is described by a separate file. This means that you can add launchd timed jobs by simply adding or removing a file.
- If the computer is asleep at the designated time, a launchd job executes as soon as the computer wakes. This is similar to the behavior of anacron and other cron replacements).
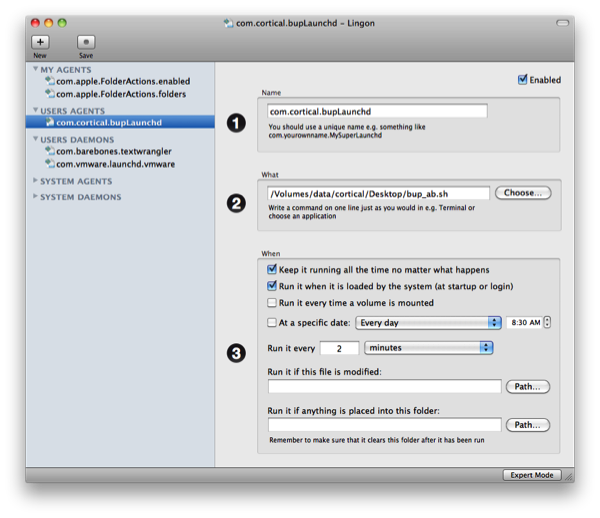
Creating lauchd files is very easy using the free utility Lingon. Lingon creates and edits launchd configuration files in Mac OS X Leopard
Create a launchd plist using Lingon
Lingon really makes this easy. It has a very clean and obvious interface. This process creates an XML plist file, records where the shell scrip is (that contains the actual backup from where to where instruction) , allows setting the timing and frequency of backups, and automatically stores the plist in the right place.
The launchd file created by Lingon will execute the shell script created earlier. The shell script must use the extension .sh and have appropriate executable permissions.
- new
- place file: User Agents (launched when anyone logs in)
- //user daemons - launched at system startup (and generally as root)
- create
- name: com.cortical.bupLaunchd (naming should follow this convention; substitute 'cortical' for something relevant.
- what: use choose to locate the (appropriately permissioned) shell script file
- What = /Volumes/data/cortical/Desktop/bup_ab.sh
- when: check keep it running all the time no matter what happens
- Run when it is loaded by the system (at startup or login)
- run it every (2) minutes (for testing)
- check that enabled is checked
- save
- enter password at the prompt to allow authopen to make changes
- ok the Lingon prompt to restart/re-login
- logout (or restart) to apply changes
- monitor the destination file creation/modification time to confirm the cycling.
Namespace Clashes
While launchd offers some protection from name-space clashes, it is not good practice to give jobs names like "server" or "daemon". Apple suggests the use of the reverse-DNS naming convention; for instance, com.apple.syslogd.plist. This is an excellent convention, and you should follow it when defining your own services. Using the same names for the job labels that are used for the files will be easier to match them up. The job stored in com.apple.syslogd.plist has the tag com.apple.syslogd.

The resultant code can be checked in Expert Mode
<?xml version="1.0" encoding="UTF-8"?>

<!DOCTYPE plist PUBLIC "-//Apple//DTD PLIST 1.0//EN" "http://www.apple.com/DTDs/PropertyList-1.0.dtd">

<plist version="1.0">

<dict>

	<key>KeepAlive</key>

	<false/>

	<key>Label</key>

	<string>com.cortical.bupLaunchd</string>

	<key>ProgramArguments</key>

	<array>

		<string>/Volumes/data/cortical/Desktop/bup_ab.sh</string>

	</array>

	<key>RunAtLoad</key>

	<true/>

	<key>StartInterval</key>

	<integer>120</integer>

</dict>

</plist>
Configure launchd plist file using Lingon
- click new to create a new plist file
- place file: in the dialogue resulting from new, select User Agents (launched when anyone logs in)
- enter a name: com.cortical.bupLaunchd (naming should follow this convention; substitute 'cortical' for something relevant.
- what: click Choose to locate the (appropriately permissioned) shell script file
- when:
- check keep it running all the time no matter what happens
- Run when it is loaded by the system (at startup or login)
- run it every (2) minutes (for testing)
- check that enabled is checked
- save it
- enter password at the prompt to allow authopen to make changes
- ok the Lingon prompt to restart/re-login
- logout (or restart) to apply changes
- monitor the destination file creation/modification time to confirm the cycling.
